Getting Started with StackBench
Welcome to StackBench! This tutorial will walk you through your first benchmark run, from installation to analyzing results.
What is StackBench?
StackBench is a local tool that benchmarks how well coding agents (like Cursor) perform on library-specific tasks. It tests whether AI assistants can correctly use APIs, follow patterns, and implement realistic use cases from your documentation.
Key Benefits:
- 🏠 Local execution - Your code never leaves your machine
- 📚 Library-focused - Tests real-world usage patterns
- ⚡ IDE integration - Works with your existing development workflow
- 🎯 Actionable insights - Identify documentation gaps and common failures
Prerequisites
Before we start, ensure you have:
System Requirements
- Python 3.10+ (check with
python --version) - Node.js 18+ (check with
node --version) - Git (check with
git --version)
Required Tools
1. Install uv (Python package manager):
curl -LsSf https://astral.sh/uv/install.sh | sh
2. Install Claude Code CLI:
npm install -g @anthropic-ai/claude-code
API Keys
You’ll need API keys for:
- OpenAI - For extracting use cases from documentation
- Anthropic - For analyzing coding agent performance
Get your keys from:
- OpenAI: https://platform.openai.com/api-keys
- Anthropic: https://console.anthropic.com/
Installation
1. Clone and Install StackBench
# Clone the repository
git clone https://github.com/your-org/stackbench
cd stackbench

# Install dependencies
uv sync

# Verify installation
uv run stackbench --version
2. Configure Environment
# Copy the sample environment file
cp .env.sample .env

# Edit .env and add your API keys:
# OPENAI_API_KEY=your_openai_key_here
# ANTHROPIC_API_KEY=your_anthropic_key_here
Important: Never commit your API keys to git. The .env file is already in .gitignore.
Your First Benchmark
Let’s benchmark how well Cursor handles a real library. We’ll use the DSPy library as an example.
Step 1: Set Up the Benchmark
# Set up DSPy library benchmark with Cursor agent (Python library)
uv run stackbench setup https://github.com/stanfordnlp/dspy -a cursor -i docs -l python
This command:
- Creates a unique benchmark run with UUID in the
data/folder - Clones the DSPy repository in
data/<run-id>/repo - Extracts use cases from the
data/<run-id>/repo/docs/ - Prepares everything for manual execution
Step 2: Execute Use Cases in Cursor
Now for the fun part - let’s see how Cursor handles library-specific tasks!
For each use case:
- Get the formatted prompt:
uv run stackbench print-prompt <run-id> -u 1 --copyThis copies a detailed prompt to your clipboard with:
- Use case description and requirements
- Target audience and complexity level
- Specific implementation requirements
- Where to save your solution
- Open Cursor IDE: If you’re not already in Cursor, open it at the StackBench root:
cursor . -
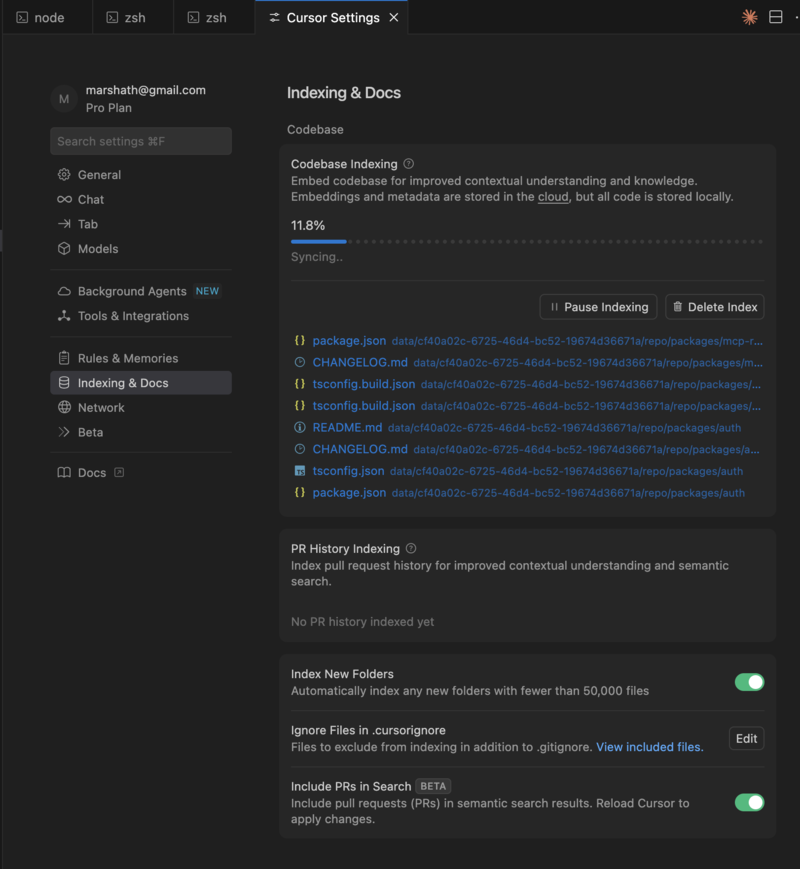
⚠️ Wait for Cursor indexing to complete - Check Cursor Settings → “Indexing & Docs” → “Codebase Indexing” and wait until it shows 100%. This is critical for Cursor to understand the library’s APIs and patterns.
-
Start a new chat session and paste the prompt
-
Let Cursor explore the repository and propose a solution
-
Review and accept the implementation (or make modifications)
- Repeat for all use cases (use
-u 2,-u 3, etc.)
Step 3: Analyze Results
Once you’ve implemented all use cases:
uv run stackbench analyze <run-id>
This will:
- Test each implementation for correctness
- Analyze library usage patterns
- Evaluate documentation consultation
- Generate a comprehensive report in
data/<run-id>/results.md
Step 4: Review Results
Open the generated report:
# Read human-friendly analysis
cat ./data/<run-id>/results.md

# View structured results
cat ./data/<run-id>/results.json
The report will show:
- Pass/Fail Status: Did Cursor successfully handle DSPy tasks?
- Success Rate: 4/5 tasks successful (80%)
- Common Failures: API deprecation issues, missing imports
- Insights: Specific improvements needed in documentation
Understanding the Results
Success Indicators ✅
- Code executes without errors
- Uses real library APIs (not mocked)
- Follows library conventions
- Implements functional requirements
Warning Signs ⚠️
- Code uses mocking instead of real APIs
- Missing error handling
- Outdated API usage
- Partial implementation
Failure Patterns ❌
- Syntax errors or import failures
- Deprecated API usage
- Incorrect configuration
- Missing dependencies
Common Issues and Solutions
“Module not found” errors
Problem: Cursor tries to import non-existent modules Solution: Check if your documentation references outdated imports
High mocking rate
Problem: Cursor creates fake implementations instead of using real APIs Solution: Your documentation may lack clear, executable examples
Low success rate
Problem: Most use cases fail to execute Solution: Consider updating installation instructions or API examples
Next Steps
Now that you’ve completed your first benchmark:
- Review the specific failures in your results report
- Update your documentation based on the insights
- Re-run the benchmark to validate improvements
- Try different libraries to expand your understanding
- Share results with your team or library maintainers
Command Quick Reference
# Set up new benchmark
stackbench setup <repo-url> -a cursor -i <folders>

# Get use case prompt
stackbench print-prompt <run-id> -u <number> --copy

# Analyze implementations
stackbench analyze <run-id>

# Check status
stackbench status <run-id>

# List all runs
stackbench list
What’s Next?
- How StackBench Works - Understanding the pipeline stages
- CLI Commands Reference - Complete command documentation
Getting Help
- Check status:
stackbench status <run-id>for detailed progress - View logs: Look in
./data/<run-id>/logsfor execution details - Community: Open issues on GitHub for support
Congratulations! You’ve successfully completed your first StackBench benchmark. You now have concrete insights into how well coding agents handle your library’s specific use cases.